To capture star trails using stacked exposures, start by aligning your camera with the celestial pole, preferably using Polaris, to guarantee circular trails. Take multiple long-exposure shots with manual settings, keeping ISO low and aperture wide. Use a tripod to keep the camera steady and avoid motion blur. After capturing, stack your images with editing software to create smooth, continuous star trails. If you want to know more about perfecting this technique, there’s more to explore below.
Key Takeaways
- Use a tripod and manual camera settings to ensure consistent exposures for stacking.
- Capture multiple shorter exposures instead of a single long shot to reduce noise and overexposure.
- Align the camera precisely with the celestial pole using Polaris for circular star trails.
- Maintain consistent exposure settings across all shots for seamless stacking results.
- Use stacking software to combine images, creating smooth, continuous star trail effects.

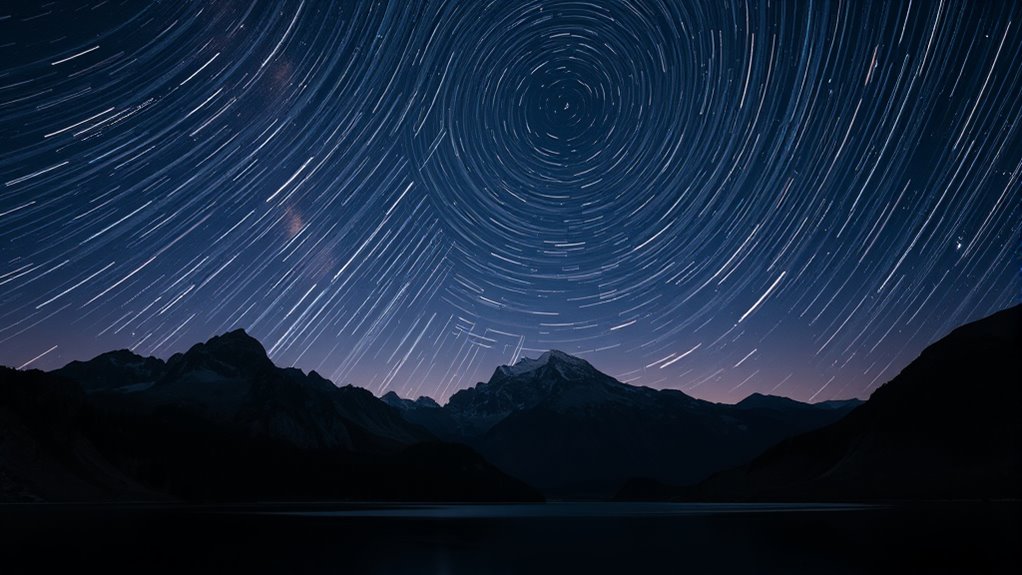
Have you ever wondered how photographers capture the mesmerizing streaks of light that appear to swirl across the night sky? It’s a combination of understanding celestial navigation and mastering exposure techniques. When you set out to photograph star trails, you’re essentially tracking the Earth’s rotation, which causes the stars to appear as streaks rather than points. To do this effectively, you need to think about how your camera’s exposure can be manipulated to record these movements over time.
Celestial navigation isn’t just for sailors; it plays a key role in star trail photography too. Knowing the position of the North Star (Polaris) or other celestial markers helps you orient your camera correctly. By aligning your camera’s axis with Earth’s rotational axis, you guarantee that star trails form smooth, circular arcs around the celestial pole. This alignment makes your images more striking and authentic, giving viewers a clear sense of the Earth’s rotation. The process involves a bit of research beforehand—identify the celestial pole in the sky and position your camera to face it directly. This step is vital for capturing beautiful, concentric star trails.
Align your camera with Earth’s rotational axis using Polaris for smooth, circular star trails.
Once your camera is properly aligned, you’ll focus on exposure techniques. Unlike quick snapshots, star trail photography requires long exposure times to record the movement of stars across the sky. You can do this through a single, extended exposure or by stacking multiple shorter exposures. The stacked method is often preferred because it minimizes noise and allows for better control. With each shot, you set your camera to manual mode, use a low ISO setting to reduce grain, and open the aperture wide enough to gather sufficient light. Then, set a long shutter speed—anywhere from a few minutes to several hours, depending on your desired trail length.
However, keep in mind that prolonged exposures can introduce noise and overexposure issues. To address this, many photographers take multiple shorter exposures and later combine them using stacking software. This technique preserves detail, reduces noise, and allows for precise control over the final image. When stacking, you remove any unwanted light pollution or atmospheric disturbances and enhance the star trails’ clarity. This process emphasizes the importance of understanding exposure techniques, as it’s the key to transforming a series of individual images into a seamless, swirling masterpiece.
In the end, capturing star trails using stacked exposures demands patience, preparation, and an understanding of celestial navigation. When you get it right, you’ll be rewarded with stunning images that beautifully illustrate the Earth’s rotation and your skill in mastering exposure techniques.

Sky Watcher Star Adventurer Tripod – Star Adventurer Accessory – Compatible with AZGT Series and AZ5 Mounts (S20555)
Star Adventurer Mini and Star Adventurer Tripod
As an affiliate, we earn on qualifying purchases.
As an affiliate, we earn on qualifying purchases.
Frequently Asked Questions
What Camera Settings Are Best for Star Trail Stacking?
You should use a wide-angle camera lens, ideally between 14mm and 24mm, to capture expansive star trails. Set your camera to manual mode, with a low ISO around 800-1600, and use long exposure times, typically 15-30 seconds per shot. For best results, employ image stacking techniques by taking multiple shots and blending them in post-processing. Keep your aperture wide open, around f/2.8 or lower, for maximum light.
How Do I Prevent Star Trails From Overexposing?
To prevent star trails from overexposing, keep your exposure time short and use a low ISO setting, contrary to star trail myths that say longer exposures are better. Many astrophotography myths suggest that stacking longer exposures automatically results in better trails, but this can lead to overexposure. Instead, take multiple shorter exposures and stack them, ensuring you capture vibrant trails without washing out the stars or sky.
Can Smartphone Cameras Capture Star Trails Effectively?
Think of smartphone cameras as the David facing Goliath of astrophotography myths. While they can’t match dedicated gear, you can still capture star trails by using long exposure apps and stacking multiple shots. Limitations like smaller sensors and less light sensitivity mean you need steadiness and patience. With careful technique, your phone can produce surprisingly stunning star trail images, proving you don’t need professional gear to reach for the stars.
What Software Is Recommended for Stacking Star Trail Images?
You should consider software options like StarStaX, Adobe Photoshop, or Sequator for stacking star trail images. These programs simplify stacking techniques by aligning and blending multiple exposures, creating smooth, continuous star trails. StarStaX is user-friendly for beginners, while Photoshop offers advanced features if you’re experienced. Sequator is especially popular for its automatic alignment and stacking, making it a great choice for capturing stunning star trails efficiently.
How Do Weather Conditions Affect Star Trail Photography?
Think of weather conditions as the canvas for your star trail photography; clear skies are your best backdrop. Cloud cover can obscure stars, much like fog blurs a distant mountain, and wind disturbances shake your camera, blurring trails or causing movement. I once lost hours of shooting to unexpected clouds. To get sharp, stunning trails, plan your shoots on nights with minimal cloud cover and calm winds for the clearest results.

OCQOTAT Photography Cheat Sheet for DSLR Camera Accessories for Canon Nikon Sony,Quick Reference Cards Photographers Book for Beginners,Settings,Exposure, Modes,Composition,Lighting, etc.4×3 Inch
Comprehensive Guide for Nikon, Canon, and Sony DSLRs:This 30-page photography guide is specifically designed for DSLR camera owners,…
As an affiliate, we earn on qualifying purchases.
As an affiliate, we earn on qualifying purchases.
Conclusion
By stacking exposures, you transform fleeting star movements into timeless arcs, blending chaos into order. While the night sky seems endless and unpredictable, your careful technique creates a sense of control and artistry. In capturing star trails, you bridge the universe’s vastness with your own patience and skill, turning transient moments into permanent beauty. Ultimately, this process reminds you that even the most fleeting celestial dances can be preserved, revealing both the universe’s mystery and your mastery.
star trail stacking software
As an affiliate, we earn on qualifying purchases.
As an affiliate, we earn on qualifying purchases.

Astromania Polar Alignment Scope for EQ3, Telescope Accessories Polar Finder Quickly&Easily Correct Alignment of Equatorial Mount with The North Celestial Polar, Allow Long Exposure Astrophotography
Polar Alignment Scope For EQ3: Achieve good alignment of the EQ3 equatorial mounts with the North Celestial Pole…
As an affiliate, we earn on qualifying purchases.
As an affiliate, we earn on qualifying purchases.