
Without a tracker, understanding field rotation helps you plan your exposures to avoid star trails. Earth’s rotation causes stars to drift across your sensor, so shorter sub-exposures—typically 10 to 30 seconds—can prevent trails and maintain sharp points. Precise polar alignment reduces star movement, allowing for better control of exposure lengths. Experimenting with different durations and stacking images will optimize your results. Keep exploring to learn how adjusting these factors maximizes your astrophotography quality.
Key Takeaways
- Shorten sub-exposure durations (10-30 seconds) to minimize star trailing caused by Earth’s rotation.
- Precise polar alignment reduces apparent star movement during fixed exposures.
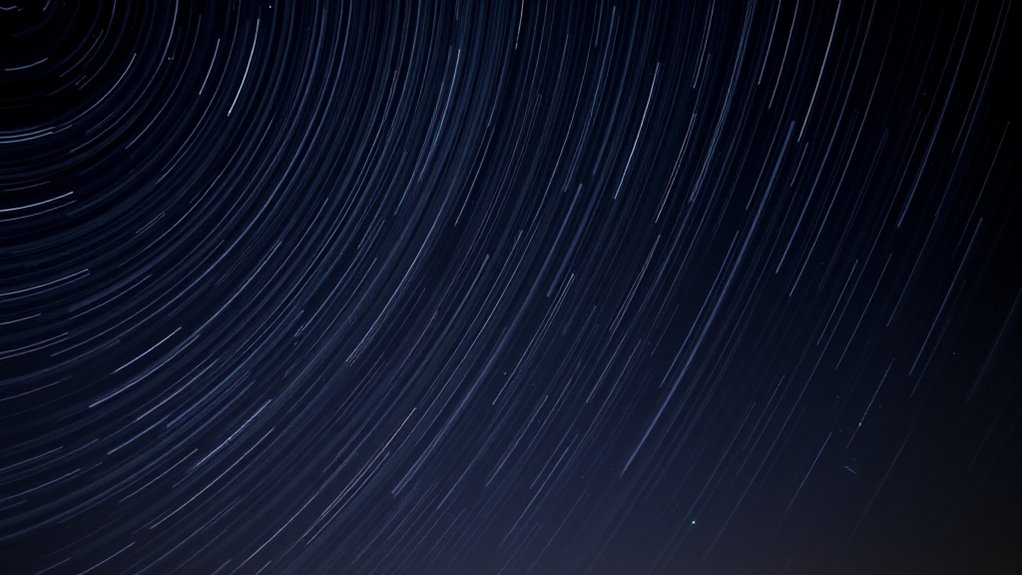
- Increasing exposure length without tracking leads to noticeable star trails, limiting image sharpness.
- Stacking multiple short exposures compensates for reduced individual brightness while controlling field rotation effects.
- Monitoring star movement during test shots helps determine optimal exposure times for your setup.

When capturing astrophotography images, understanding how field rotation affects your shots is essential for achieving sharp, accurate results. Without a tracking mount, the Earth’s rotation causes stars to drift across your camera’s sensor, leading to star trails and blurry images if you don’t account for this rotation. To minimize these issues, you need to focus on polar alignment and exposure optimization. Accurate polar alignment aligns your camera’s sensor with Earth’s rotational axis, reducing the apparent movement of stars during your exposure. Even if you’re not using a tracker, refining your polar alignment helps you understand how the sky moves in your specific setup, giving you a better handle on how long your sub-exposures can be without excessive star trailing.
Exposure optimization is your best tool for managing field rotation when tracking isn’t an option. The longer your exposure, the more noticeable the star trails become due to field rotation. To keep images sharp, you’ll want to keep sub-exposure lengths short enough that rotation doesn’t blur your stars. This length varies depending on your equipment and the celestial object you’re imaging, but generally, shorter exposures—around 10 to 30 seconds—help maintain star point integrity. By limiting exposure times, you reduce the impact of field rotation, even without a tracker. However, shorter exposures need to be balanced with your camera’s sensitivity and the brightness of your target, often requiring multiple shots to achieve a good signal-to-noise ratio.
Achieving best results involves experimenting with your setup. Start by aligning your mount as precisely as possible with the celestial pole, ensuring your polar alignment is tight. Then, test different sub-exposure durations to see how much rotation occurs over those intervals. If your stars start to trail, cut back on exposure length or consider stacking multiple short exposures. This stacking process allows you to improve your image’s brightness and detail without letting field rotation ruin individual frames. Remember, the goal is to find a sweet spot where exposures are long enough to gather sufficient light but short enough to prevent noticeable star trailing caused by field rotation. Additionally, understanding the contrast ratio of your optical system can help you better judge the quality of your images and determine optimal exposure settings to enhance star clarity.

SVBONY SV105 Telescope Camera, 1.25" USB2.0 IMX307 CMOS Color Astrophotography Camera, Electronic Telescope Eyepiece for Telescope, Suitable for Astrophotography Beginners
SV105 telescope camera is the basic method for starting astronomical imaging; you can use the SV105 electronic telescope…
As an affiliate, we earn on qualifying purchases.
As an affiliate, we earn on qualifying purchases.
Frequently Asked Questions
How Can I Correct Field Rotation Without a Tracking Mount?
You can correct field rotation without a tracking mount by manually realigning your camera periodically during your session. Use manual alignment to ensure your telescope or camera is properly aligned with the celestial pole. To manage sky rotation, take shorter exposures and adjust your camera’s position as needed to compensate for the rotation. Regularly rechecking your alignment and making small adjustments helps keep your images sharp without a tracker.
What Tools Are Best for Measuring Sub-Exposure Length Accurately?
To measure sub-exposure length accurately, you should use a reliable star tracker combined with a quality intervalometer. A star tracker helps you monitor star movement precisely, ensuring your exposures are consistent, while an intervalometer allows you to set and verify exact exposure durations. Together, these tools give you precise control and measurement, helping you optimize your imaging sessions and minimize errors caused by incorrect sub-exposure timing.
Can Software Compensate for Field Rotation in Post-Processing?
Yes, software can help compensate for field rotation during post-processing. Techniques like stacking and alignment algorithms can correct some rotation effects, especially with well-calibrated images. However, software has limitations; severe rotation or very long exposures may cause artifacts or data loss. You should always aim for proper tracking during capture, but if needed, post-processing can mitigate minor rotation issues to improve your final image quality.
How Does Latitude Affect Field Rotation and Exposure Planning?
Your latitude determines how quickly the celestial pole appears to move, affecting sky rotation. Near the equator, the celestial pole is high, causing slower rotation and longer exposures. Closer to the poles, the pole is low, making sky rotation faster and shorter exposures necessary. Planning your shots requires understanding this relationship, so you can adjust your sub-exposure length accordingly, ensuring sharp images without a tracker.
What Are the Risks of Using Very Long Sub-Exposures Without Tracking?
Using very long sub-exposures without tracking risks image blur and star trailing, which can ruin your astrophotography. As Earth rotates, stars appear to move across your camera’s field of view, causing trails instead of crisp points. Longer exposures increase this effect, making it harder to achieve sharp images. To avoid star trailing, keep sub-exposure lengths short or use tracking equipment, ensuring your images remain clear and detailed.

Astromania Polar Alignment Scope for EQ-5, Quickly and Easily Align Your Equatorial Mount with The North Celestial Polar – The Foundations for Successful Astrophotography
Full metal; Good alignment of the mount with the North Celestial Pole can be achieved in a short…
As an affiliate, we earn on qualifying purchases.
As an affiliate, we earn on qualifying purchases.
Conclusion
Think of your telescope as a steady boat on a flowing river. Without a tracker, you’re drifting with the current, so you must time your paddles carefully. By understanding field rotation and choosing the right sub-exposure length, you’re gently steering through the night sky’s currents, preventing blurring and keeping your celestial voyage smooth. Master these techniques, and you’ll navigate the cosmos confidently, capturing stunning images even without a tracker’s anchor.

Equatorial Mount Star Tracker with Ball-Head Gimbal for Astrophotography
The shell of the equatorial mount is made of PETG and carbon fiber (CF).
As an affiliate, we earn on qualifying purchases.
As an affiliate, we earn on qualifying purchases.

ASTROPHOTOGRAPHY PROCESSING MADE EASY: The Complete Beginner's Guide to Editing Deep-Sky Images with Open-Source Software (Telescope Guides for Stargazing (Astrophotography))
As an affiliate, we earn on qualifying purchases.
As an affiliate, we earn on qualifying purchases.


![SpaceX Starship Flight 13 Livestream [Video]](https://astrophotographyhq.com/wp-content/uploads/2026/07/spacex-starship-flight-13-livestream-video-featured-260x140.jpg)