To quickly spot RA and DEC errors on your guiding graph, keep an eye on error patterns: steady drift indicates misalignment, while oscillations suggest guiding adjustments need tuning. RA errors often show as consistent left or right shifts, whereas DEC errors appear as up or down star elongation. External factors like wind or equipment issues can cause sudden spikes. If you keep analyzing these signs, you’ll gain insights that help improve your guiding precision and image quality—more tips await as you continue.
Key Takeaways
- Identify consistent RA or DEC drift patterns to diagnose mount misalignment or calibration issues.
- Recognize periodic peaks or oscillations indicating backlash, wind, or guiding correction problems.
- Smooth, stable lines suggest good tracking; sudden jumps or irregularities point to external disturbances.
- Detect long-term gradual drift in RA or DEC signals misalignment needing realignment or calibration.
- Use error trend analysis to differentiate between systematic and random guiding issues for targeted corrections.

YUEOCT Video Camera DSLR Metal Adapter Mount with 1/4" Mounting Screw for Optical Telescope Finderscope Finder Scope Dovetail Base Shoe Bracket Sky Astrophotography
【Function】 This solid aluminum adapter mounts into the finder dovetail base and holds camera in place while recording.
As an affiliate, we earn on qualifying purchases.
As an affiliate, we earn on qualifying purchases.
What Are RA and DEC Errors and Why They Matter

Understanding RA and DEC errors is essential because they directly impact the accuracy of your guiding system during astrophotography. RA (Right Ascension) and DEC (Declination) errors occur when your mount’s polar alignment and calibration aren’t precise. If your mount isn’t properly aligned with the celestial pole, guiding corrections will be off, causing star trails or blurry images. RA errors often result from clock inaccuracies or misalignment, while DEC errors stem from imperfect polar alignment. Correctly diagnosing these errors helps you make necessary adjustments to your mount calibration, reducing tracking issues. Recognizing the difference between RA and DEC errors allows you to target specific issues, ensuring your mount tracks celestial objects smoothly and your images stay sharp.

Astromania Polar Alignment Scope for EQ3, Telescope Accessories Polar Finder Quickly&Easily Correct Alignment of Equatorial Mount with The North Celestial Polar, Allow Long Exposure Astrophotography
Polar Alignment Scope For EQ3: Achieve good alignment of the EQ3 equatorial mounts with the North Celestial Pole…
As an affiliate, we earn on qualifying purchases.
As an affiliate, we earn on qualifying purchases.
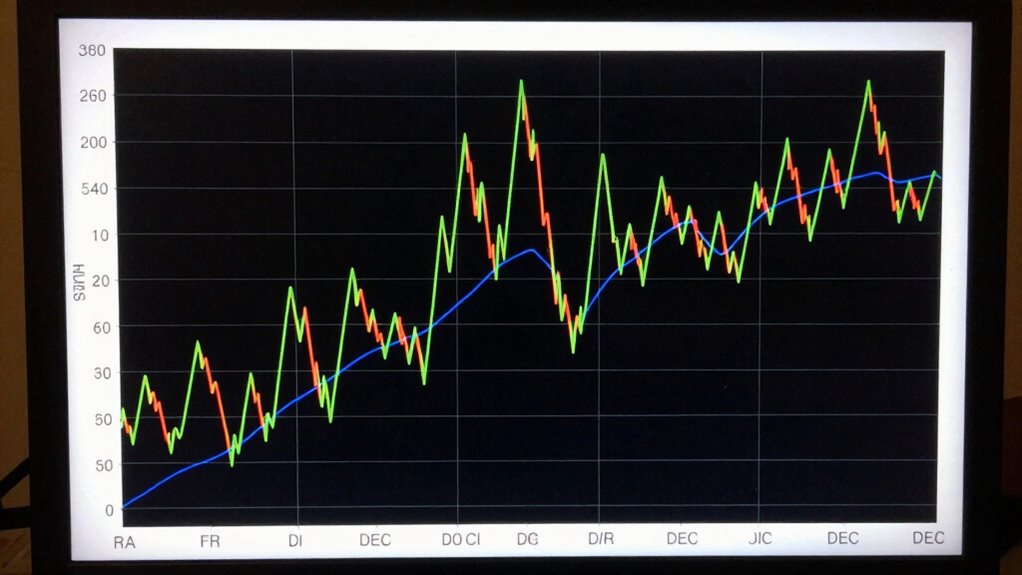
How to Interpret Your Guiding Graph Effectively

To interpret your guiding graph effectively, start by recognizing common guiding patterns and understanding what they indicate about your setup. Look for consistent error trends over time to identify issues that need correction. Additionally, understanding watt-hours can help you gauge the performance capacity of your equipment. By exploring content formats, you can enhance your comprehension of the data presented. Finally, make precise adjustments based on these observations to achieve the best possible guiding performance. Additionally, consider how color accuracy plays a vital role in ensuring your visuals are sharp and true to life.
Recognize Guiding Patterns
Recognizing guiding patterns is essential for diagnosing and improving your astrophotography setup. When you observe your guiding graph, look for familiar shapes that indicate specific issues. Mountain peaks suggest periodic errors, while smooth, consistent lines mean your mount tracks well. Sudden jumps represent backlash or wind interference. Wavy patterns resemble star trails, indicating drift or misalignment. Use this table to interpret common patterns:
| Pattern | Meaning | Action |
|---|---|---|
| Sharp peaks | Periodic error | Adjust gears or calibration |
| Smooth lines | Good tracking | Maintain current setup |
| Wavy or star trails | Drift or misalignment | Re-align your mount |
Getting familiar with these patterns helps you quickly identify problems and optimize your guiding, ensuring sharper astrophotos.
Identify Error Trends
Once you’ve learned to spot common guiding patterns, the next step is to interpret what these patterns reveal about your mount’s performance over time. Recognizing error trends helps you diagnose issues related to polar alignment and equipment calibration. Look for consistent drift in RA or DEC, which indicates misalignment or calibration needs. Sudden spikes may suggest external disturbances or equipment flexure. Gradual increases in error could signal a need to refine your polar alignment. Keep an eye on recurring oscillations, as they often point to guiding corrections that are too aggressive or too weak. By understanding these trends, you can better pinpoint whether your mount struggles with polar alignment or calibration, leading to more accurate adjustments and improved guiding performance.
Adjust for Optimal Results
Interpreting your guiding graph effectively is key to making precise adjustments that improve your mount’s performance. First, analyze the RA and DEC error patterns to identify consistent drift or oscillations. If your graph shows steady, directional errors, it indicates a need for better polar alignment. Correcting polar alignment can notably reduce systematic errors. When errors fluctuate randomly, it suggests calibration issues or mount flexure—address these by refining your mount calibration. Use the guiding graph to determine if adjustments in declination or right ascension are needed. Small, consistent corrections often yield better results than large, abrupt ones. Continuously monitor your guiding graph after each adjustment, ensuring your corrections lead to smoother, more stable guiding. With practice, you’ll interpret your guiding graph like a pro, optimizing your astrophotography sessions. Additionally, incorporating deep breathing techniques can help you maintain focus during the adjustment process.

Celestron – StarSense Autoguider Telescope Accessory for Computerized Telescopes – 3-Minute Auto Alignment – Precise GoTo and Guiding for Astroimaging – Advanced Mount Modeling for Astrophotography
LEVEL-UP YOUR CELESTRON TELESCOPE WITH STARSENSE TECHNOLOGY: This all-in-one solution makes using your telescope for astroimaging or visual…
As an affiliate, we earn on qualifying purchases.
As an affiliate, we earn on qualifying purchases.
How Can You Spot RA Errors on Your Guiding Graph?

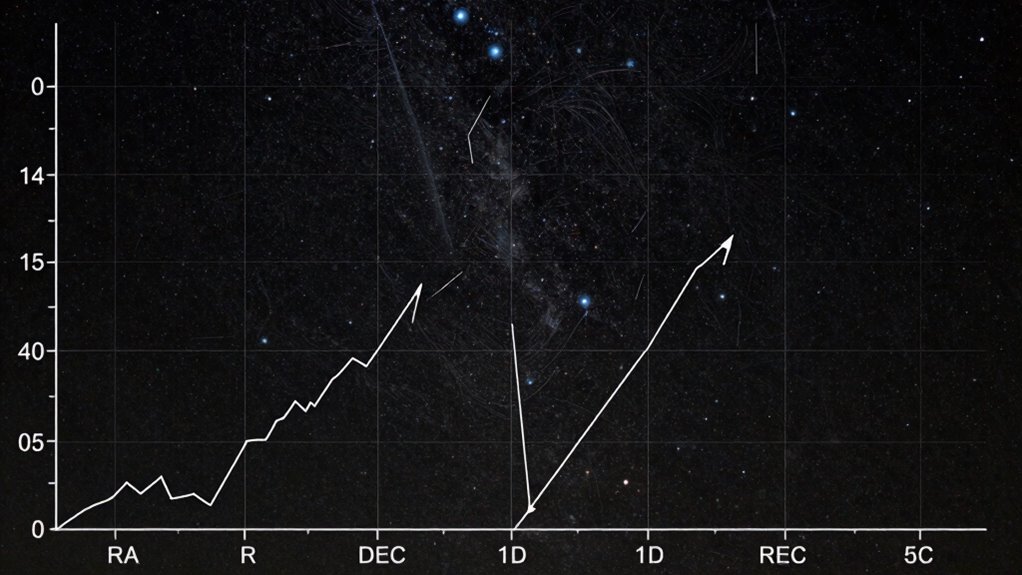
To spot RA errors on your guiding graph, look for sudden drifts that break the smooth trend, indicating a misalignment. Also, keep an eye out for pattern deviations, such as periodic or irregular shifts, which can signal issues with your mount or guiding setup. Recognizing these signs early helps you correct errors before they affect your imaging results. Additionally, understanding natural filtration systems can enhance your overall setup by ensuring a cleaner environment for your imaging activities.
Identifying Sudden Drifts
Sudden drifts on your guiding graph are clear signs that something has gone wrong with your RA tracking. You can spot these abrupt shifts through star trail analysis, where stars suddenly elongate or shift direction unexpectedly. Look for sharp, vertical lines or jumps in the graph that don’t match the steady, smooth pattern of proper guiding.
To troubleshoot, consider these points:
- Check for equipment calibration issues that might cause sudden jumps.
- Ensure your mount is properly balanced.
- Watch for temporary obstructions or vibrations.
- Review your guiding settings for sudden changes.
- Confirm that your guiding camera is functioning correctly.
Quickly identifying these drifts helps you correct issues before they ruin your imaging session.
Recognizing Pattern Deviations
Pattern deviations on your guiding graph reveal more subtle issues than sudden drifts, often indicating gradual RA errors that develop over time. These errors can cause the star trail to slowly shift, creating gentle curves rather than straight lines. Light pollution can mask or exaggerate these patterns, making it harder to spot the problem. Instead of abrupt jumps, look for consistent, smooth deviations that curve in one direction. Over multiple frames, these subtle shifts accumulate, revealing a creeping RA error. By recognizing these patterns early, you can adjust your guiding settings before they become more pronounced. Keep an eye on the guiding graph for gentle bends or waves, especially in areas affected by light pollution, to catch and correct errors before they ruin your imaging session. Additionally, incorporating foam rolling techniques can enhance your recovery and help maintain steady performance during your imaging sessions.

ANGSO-AUTO ADAS Calibration Tool Kit Compatible with Honda Toyota Kia Ford ADAS Radar Aiming Calibration Tool,Post with 0-30 Centimeter Scale,Corner Reflector Target with Billet Aluminum Stand
Universal Compatibility: Fit for Honda, Toyota, Kia, and Ford vehicles,Whether you're a professional mechanic or a DIY enthusiast,…
As an affiliate, we earn on qualifying purchases.
As an affiliate, we earn on qualifying purchases.
DEC Errors: Recognizing Their Signs and Effects
Dec errors in your guiding graph often reveal themselves through specific signs that indicate misalignment or tracking issues. These signs may include steady drift, oscillations, or star elongation in the declination direction. When DEC errors occur, it often points to issues with polar alignment or equipment calibration. You might notice your stars slowly drifting south or north, despite proper RA tracking. Misalignment of your mount’s polar axis can cause consistent DEC drift, while improper calibration can lead to oscillations or irregular movements. Recognizing these signs early helps you correct DEC issues before they affect your imaging. Regularly check your polar alignment and verify your equipment calibration is accurate to minimize DEC errors and achieve sharper, more stable astrophotos.
- Steady star drift in declination
- Star elongation in the DEC axis
- Oscillations or jitter
- Inconsistent star positions
- Persistent directional shift
Top Causes of RA and DEC Tracking Errors
Understanding the main causes behind RA and DEC tracking errors helps you diagnose and fix guiding issues more effectively. Poor polar alignment is a primary culprit, causing the mount to drift and resulting in inaccurate tracking. Even small misalignments can markedly impact RA and DEC accuracy. Equipment calibration also plays an essential role; if your mount or guiding system isn’t properly calibrated, it can introduce consistent errors. Mechanical issues, such as loose gears or worn bearings, can cause slip or hesitation, affecting tracking precision. Environmental factors like wind or temperature fluctuations may also disrupt your mount’s stability. Regularly checking and correcting polar alignment, along with maintaining and calibrating your equipment, minimizes these errors and keeps your guiding performance on point. Additionally, understanding gear care tips can enhance your overall cycling experience and help prevent issues that may affect tracking accuracy.
Quick Tips to Correct Guiding Errors

When guiding errors appear, quick adjustments can often make a significant difference in improving your tracking accuracy. Start by checking your equipment calibration—ensure your mount and guider are properly aligned. Make software adjustments by fine-tuning your guiding parameters, like aggressiveness or calibration settings. Here are some quick tips:
- Re-center your guide star for better signal
- Adjust the guider’s exposure time to improve tracking
- Check for any cable or mount obstructions
- Restart guiding software to clear minor glitches
- Recalibrate your guiding setup if errors persist
These small tweaks can correct common issues in real-time. Remember, consistent equipment calibration and prompt software adjustments are essential to maintain ideal guiding performance. With practice, these tips become second nature for troubleshooting guiding errors on the fly.
How to Monitor Your Guiding Performance Over Time
After making quick adjustments to correct guiding errors, it’s important to track your performance over time. Monitoring your guiding graph helps you identify trends and assess mounting stability, which influences guiding accuracy. Regularly review your RA and DEC error patterns to determine if your calibration techniques are effective. Keep a log of guiding session data, noting any fluctuations or recurring issues. This record allows you to spot long-term stability improvements or declines. Use guiding software to analyze sub-exposure data, focusing on consistent error levels. If you notice persistent drift or increased errors, revisit your calibration procedures, ensuring your mount is properly aligned and stable. Continuous monitoring enables you to fine-tune your setup and achieve sharper, more consistent astrophotos.
Best Practices to Prevent Guiding Errors in Astrophotography
To prevent guiding errors in astrophotography, start by ensuring your mount is properly aligned and securely mounted. Accurate celestial positioning depends on stable setup and precise calibration. Regularly check your astrophotography equipment for loose screws or misaligned parts. Use high-quality guide scopes or cameras to improve tracking. Keep your mount’s firmware updated to fix bugs and enhance performance. Adjust guiding parameters to match your setup’s specific needs, avoiding overcorrection. Monitor guiding graphs closely to catch early signs of drift or jitter.
- Verify mount alignment daily
- Use a sturdy, vibration-free tripod
- Calibrate guiding routines before sessions
- Keep guiding software and firmware up-to-date
- Regularly clean lenses and sensors for clear signals
Frequently Asked Questions
How Do RA and DEC Errors Affect Image Quality Long-Term?
RA and DEC errors can considerably impact your long-term image quality by causing star trailing and blurring. If your mount calibration isn’t precise, these errors lead to poor star tracking, resulting in elongated or streaked images over time. Regularly monitoring and adjusting RA and DEC errors helps maintain accurate tracking, ensuring sharp, high-quality astrophotos. Consistent calibration minimizes the cumulative effects of these errors, preserving your images’ clarity and detail.
Can Guiding Graph Patterns Predict Equipment Failures?
Yes, guiding graph patterns can help predict equipment failures. If you notice irregularities like inconsistent mount alignment or sudden changes in periodic error, these signals often point to potential issues. By regularly analyzing your guiding graph, you can identify early signs of mechanical problems or misalignments, allowing you to perform maintenance before failures occur. This proactive approach helps guarantee your equipment runs smoothly and images stay sharp.
What Software Tools Best Analyze RA and DEC Error Trends?
You should use software tools like PHD2 Guiding, Astro Photography Tool (APT), or Maxim DL for analyzing RA and DEC error trends. These programs excel at software diagnostics and offer clear trend visualization, helping you identify guiding issues quickly. They allow you to monitor error patterns over time, making it easier to troubleshoot and optimize your equipment’s performance for better astrophotography results.
How Do Environmental Factors Influence RA and DEC Guiding Errors?
Environmental factors like atmospheric turbulence and temperature fluctuations considerably impact your RA and DEC guiding errors. Turbulence causes rapid, unpredictable shifts in star positions, making guiding more challenging. Temperature changes can cause telescope components to expand or contract, leading to misalignments. To minimize these effects, make certain your telescope is well-insulated, and monitor weather conditions closely. Adjust guiding parameters accordingly, and consider using adaptive optics if available for more precise corrections.
Is There a Standard Threshold for Acceptable RA and DEC Errors?
Did you know that a common acceptable RA and Dec error is around 1 arcsecond? For precise astrophotography, you should aim for errors below this threshold. Using proper calibration techniques and ensuring accurate mount alignment are key to maintaining these standards. While specific thresholds vary, seeking minimal errors enhances image quality, so regularly check your guiding graph and fine-tune your setup to stay within those ideal limits.
Conclusion
Think of your guiding graph as a compass guiding your astrophotography voyage. When you read it well, it points you toward clear, sharp images—your star map’s true north. By understanding RA and DEC errors, you’re steering your telescope with confidence, avoiding pitfalls like drifting clouds or lost stars. Keep your eyes sharp, correct your course promptly, and enjoy your celestial journey with the assurance that every shot takes you closer to capturing the universe’s masterpiece.