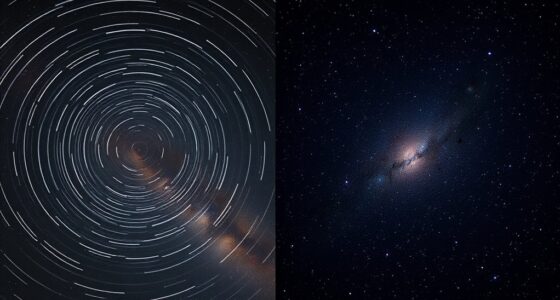
Autoguiding eliminates star trails in long exposures by constantly tracking a reference star and making real-time corrections to your mount’s movement. As the sky shifts, your guiding system detects tiny deviations and adjusts the mount to stay precisely on target. This prevents streaks and keeps stars sharp throughout extended exposures. When you understand how calibration and proper maintenance improve guiding accuracy, you’ll see how it enables crisp, trail-free images—and there’s more to discover below.
Key Takeaways
- Autoguiding detects slight star movement and sends real-time corrections to the mount, maintaining accurate tracking during long exposures.
- Calibration aligns guide camera movements with mount axes, ensuring precise response to tracking errors.
- Continuous adjustments prevent star trails by compensating for mount inaccuracies or external disturbances.
- Proper equipment maintenance and calibration improve guiding precision, reducing the likelihood of star streaks.
- Accurate autoguiding enables longer exposures, capturing more detail without star trails or blurring.

Autoguiding is vital for capturing clear, sharp images of the night sky, especially when photographing star trails. When you’re taking long exposures, even slight misalignments or tracking errors can turn your intended streaks into blurry, streaked images. The core of autoguiding is its ability to correct these errors in real-time, guaranteeing your telescope or camera mount accurately follows celestial objects across the sky. This technology relies on a dedicated guide scope or camera that tracks a reference star, providing continuous feedback to the mount’s control system.
To keep your autoguiding system functioning at its best, regular calibration procedures are indispensable. Calibration aligns your guiding camera’s movement with the mount’s axes, enabling precise correction signals. Typically, calibration involves pointing your setup at a bright star, then moving the mount through a series of small, controlled steps. During this process, the guiding software records how the star moves in response to known mount adjustments. Proper calibration ensures that during your long exposures, the system accurately interprets guiding errors and compensates for them, preventing star trails from forming.
Regular calibration aligns guiding camera movement with mount axes, ensuring precise correction during long exposures.
Equally important is consistent equipment maintenance. Dust, dirt, or misaligned components can interfere with the guiding camera’s ability to detect stars accurately, leading to tracking errors. Regularly cleaning your optics and checking for loose connections or mechanical wear keeps your system running smoothly. Firmware updates for your guiding software can also enhance performance, fix bugs, and improve calibration routines. When you maintain your equipment diligently, you minimize the chances of drift or jitter during long exposures, resulting in cleaner, sharper star images.
Understanding and executing proper calibration procedures isn’t just a one-time task; it’s an ongoing process. Before every imaging session, spend a few minutes calibrating your guiding system to account for any mechanical shifts or environmental changes. This routine ensures that your autoguiding remains accurate, especially when you change targets or mount positions. Additionally, keeping your mount well-maintained—lubricated, aligned, and free of mechanical issues—reduces the likelihood of guiding errors, allowing your autoguiding system to perform at its best.
In essence, successful autoguiding hinges on meticulous calibration and diligent equipment maintenance. These practices allow your guiding system to correct even the tiniest deviations, eliminating star trails and capturing stunning, pinpoint images of the night sky. With consistent attention to these details, you can confidently extend your exposure times, revealing more stars and celestial details than ever before.

Celestron CG-4 German Equatorial Mount and Tripod
SUPERIOR STABILITY - The CG-4 German Equatorial Mount features a robust stainless steel tripod with 1.75" diameter legs,...
As an affiliate, we earn on qualifying purchases.
Frequently Asked Questions
Can Autoguiding Be Used With Any Telescope?
Autoguiding is like a loyal navigator, but not all telescopes can follow its lead. You can generally use autoguiding with most modern telescopes, but compatibility depends on your telescope’s design and mount type. Check your guiding camera options and guarantee your mount supports guiding signals. Some telescopes may require adapters or specific software, so it’s wise to verify compatibility before setting sail on long exposures.
What Are the Costs Associated With Autoguiding Equipment?
The costs for autoguiding equipment vary depending on your setup. You’ll need an autoguiding camera, a guide scope or an off-axis guider, and compatible software, which can range from a few hundred to over a thousand dollars. Keep in mind, there are ongoing maintenance costs, like updating software and replacing worn parts. Overall, investing in quality gear guarantees reliable guiding and better astrophotography results.
How Does Autoguiding Affect Image Processing Time?
Autoguiding can slow down your image processing time, but it’s worth the effort for better results. By ensuring precise tracking, it boosts processing efficiency and enhances image quality, reducing post-processing adjustments. While it adds a step, the improved clarity and detail mean less time fixing star trails or distortions later. In the end, autoguiding helps you get sharper images faster, turning a mountain into a molehill.
Is Autoguiding Effective for Astrophotography at High Altitudes?
Yes, autoguiding is effective for astrophotography at high altitudes. It helps you maintain high altitude stability, compensating for atmospheric interference that can cause star movement. This guarantees sharp images despite the thinner, more turbulent air. With autoguiding, you can take longer exposures without star trails, capturing clearer, more detailed celestial images even in challenging high-altitude conditions.
What Are Common Troubleshooting Steps for Autoguiding Failures?
When troubleshooting autoguiding failures, start by checking calibration errors, ensuring your mount’s movements align with your guiding star. Next, inspect for mechanical obstructions like loose gears or debris that can disrupt tracking. Sometimes, recalibrating your autoguider or cleaning connections fixes the issue. Remember, a small obstacle or miscalibration can cause big tracking errors, so methodically review each component to restore precise guiding and capture sharp images.

Sky-Watcher Star Adventurer 2i Pro Pack – Motorized DSLR Night Sky Tracker Equatorial Mount for Portable Nightscapes, Time-Lapse and Panoramas – Wi-Fi App Camera Control – Long Exposure (S20512)
Portable nightscape tracking platform: Motorized portable tracking platform perfect for capturing incredible detail of the Milky Way, eclipses...
As an affiliate, we earn on qualifying purchases.
Conclusion
So, next time you set out to conquer the night sky, remember that autoguiding is your secret weapon against those pesky star trails. Without it, your long exposures might just turn into a celestial abstract art piece—beautiful, sure, but not quite what you had in mind. Embrace autoguiding, and you’ll keep your stars sharp and your astrophotography dreams intact. After all, who needs star trails when you can have perfectly pinpoint stars?

Sky-Watcher HEQ5 – Fully Computerized GoTo German Equatorial Telescope Mount – Motorized Astrophotography Mount with 42,000 Object Database,White
LIGHTWEIGHT COMPUTERIZED EQUAORIAL MOUNT: The HEQ5 is ideal for beginning astrophotographers, or skilled astronomers looking for a lightweight...
As an affiliate, we earn on qualifying purchases.
OrionU Star Tracking Equatorial Mount, Portable Single-Axis Star Tracker with High-Precision Alignment Pointer for DSLR & Mirrorless, Suitable for Beginners in Astrophotography (Matte Black)
Reinforced Steel Axis for Stable Tracking: Thick dual-screw steel shaft delivers solid single-axis tracking, supporting 4kg axial loads...
As an affiliate, we earn on qualifying purchases.