Stop guessing your exposure in astrophotography by mastering histograms. Use your camera’s histogram to instantly see if your shot is underexposed, overexposed, or balanced. Aim for a histogram that shows detail in both shadows and highlights without clipping. Regularly check and adjust your settings based on the shape and distribution. If you keep tightening your skills with this powerful tool, you’ll capture clearer, more consistent night sky images every time.
Key Takeaways
- Use the histogram to monitor exposure in real-time, aiming for a balanced distribution without clipping highlights or shadows.
- Adjust camera settings (ISO, aperture, shutter speed) based on histogram feedback to avoid overexposure or underexposure.
- Enable live view or viewfinder histogram display for immediate visual guidance during shooting.
- Recognize histogram shapes: a balanced curve indicates optimal exposure, while skewed histograms signal adjustments are needed.
- Regularly analyze histograms after shots to refine settings and ensure consistent, well-exposed astrophotography images.

Telescope Camera 4K, 8MP Astrophotography Camera – 1.25" Telescope Electronic Eyepiece Camera with IR Filter, Plug & Play for Astronomy, Planetary Imaging, Compatible with Windows/Mac/Linux
✅【Plug & Play Multi-OS Support】 No drivers needed! Automatically recognized by Windows 10/11, macOS 12+, and Linux via…
As an affiliate, we earn on qualifying purchases.
As an affiliate, we earn on qualifying purchases.
Understanding Exposure Principles in Astro Photography
Understanding Exposure Principles in Astro Photography
Understanding exposure principles in astro photography is essential because it directly influences the quality of your images. Your camera lenses gather light over a set period, so knowing how long to expose is vital. Longer exposures reveal more stars and detail, but they also increase the risk of overexposure and noise. Light pollution from nearby city lights can interfere, making it harder to capture clear images. To counter this, you might need to adjust your exposure time or use lenses with better light-gathering capabilities. Recognizing how different camera lenses perform in low-light conditions helps you balance exposure time and image clarity. Additionally, understanding color accuracy guarantees you capture sharp, vibrant night sky photos without guesswork. A thorough grasp of digital concepts can further enhance your ability to experiment with exposure settings effectively. Furthermore, using proper safety measures while handling equipment can ensure a safe and enjoyable shooting experience in the field. Imagination is crucial in this process, as it fuels your creativity and helps you visualize transformative possibilities in your astro photography. Embracing curiosity can lead to innovative techniques that enhance your overall photographic skills.

K&F CONCEPT 67mm Clear Natural Night Filter 28 Multi-Layer Coatings Light Pollution Reduction Filter for Night City Sky Star Shots, No Color Cast (Nano-X Series)
Reduces light pollution, creating Crystal clear night skies.
As an affiliate, we earn on qualifying purchases.
As an affiliate, we earn on qualifying purchases.
How Histograms Help You Set the Perfect Night Sky Exposure
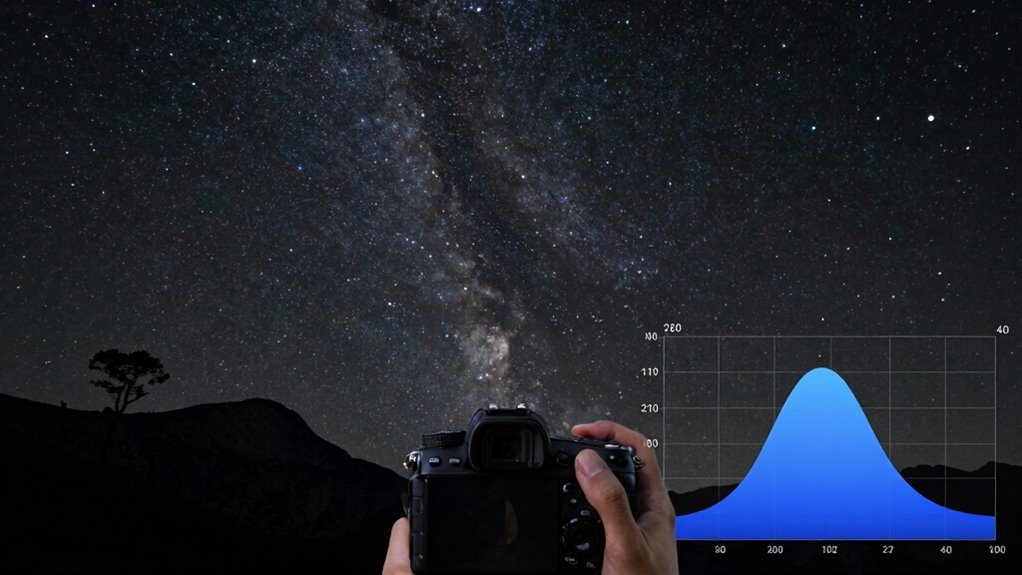
Your histogram shows you exactly how bright your image is, making it easier to spot overexposed or underexposed areas. By interpreting these brightness levels, you can fine-tune your camera settings for the perfect balance. Adjusting exposure based on the histogram helps guarantee your night sky shots are clear and well-exposed. Incorporating regular checkups into your photography routine ensures your equipment is always in optimal condition for capturing stunning images. Additionally, understanding portable restroom solutions can enhance your event planning, ensuring that your outdoor shoots are as comfortable and convenient as possible. Using a reliable battery inverter generator can also provide the power needed for your equipment during extended nighttime sessions. Investing in top car protection can safeguard your vehicle while transporting your gear, ensuring everything arrives safely at your shooting location. Furthermore, mastering pressure sensitivity levels can greatly enhance your editing precision when processing those night sky images.
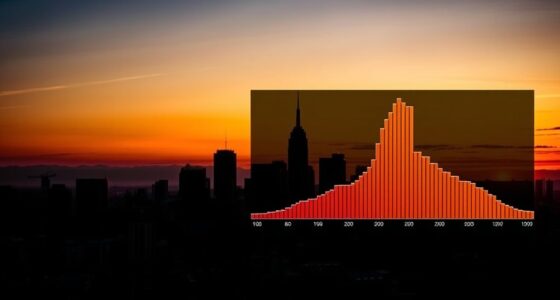
Interpreting Brightness Levels
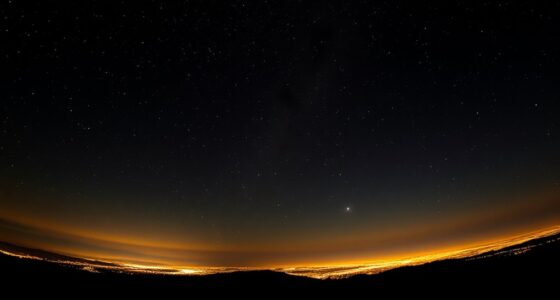
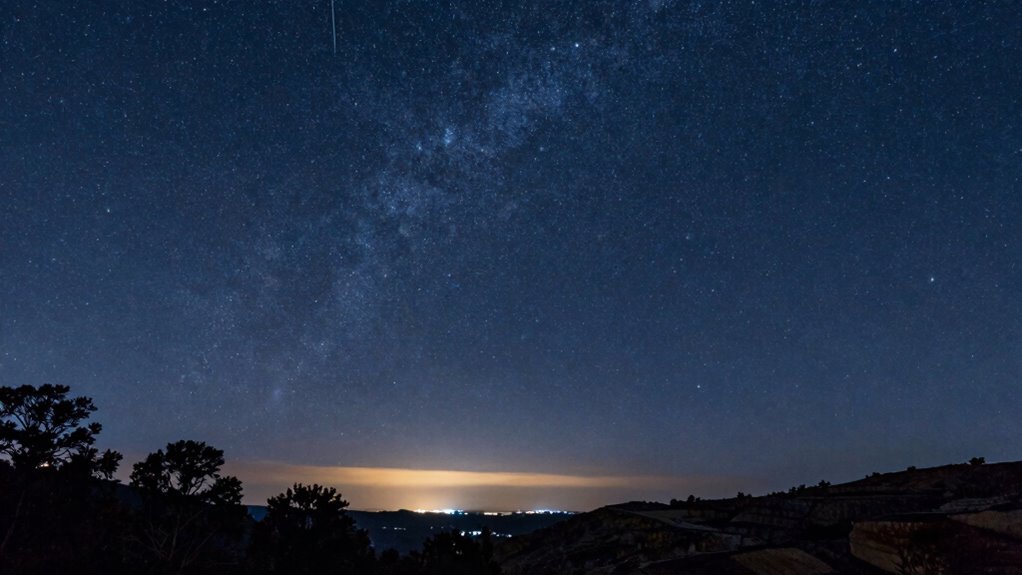
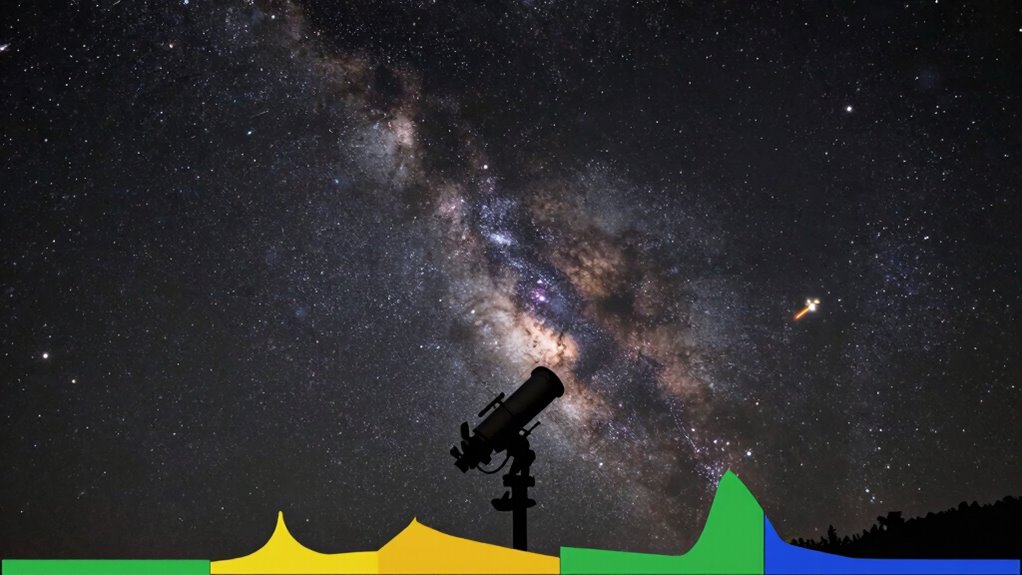
When capturing night sky images, interpreting brightness levels is essential for achieving the right exposure. Your histogram reveals whether your scene has proper tonal balance, especially during meteor showers or in areas with light pollution. A balanced histogram shows details in both shadows and highlights, preventing overexposure or loss of faint stars. For example, bright meteors can cause spikes at the right, while faint stars appear on the left. Light pollution often shifts the histogram rightward, risking overexposure. Use the following guide:
| Brightness Level | Meaning |
|---|---|
| Left | Shadows, faint stars, detail |
| Center | Correct exposure, balanced scene |
| Right | Overexposure, bright objects |
This helps you set exposures that capture the night sky’s true beauty.
Adjusting Exposure Settings
How do you make certain your night sky photos aren’t overexposed or underexposed? Using the histogram helps you adjust your exposure settings precisely. Check the histogram after your shot; if the graph is bunched to the right, your image may be overexposed, risking lens flare and star trailing loss. If it’s too far to the left, it’s underexposed, hiding faint stars. Aim for a balanced histogram with a slight push toward the right without clipping highlights. This ensures bright stars stand out without sacrificing detail. Adjust your ISO, aperture, or shutter speed accordingly. Proper exposure prevents star trailing caused by long exposures and minimizes lens flare, giving you crisp, well-exposed night sky images every time.

TTARTISAN Light Meter II, Adjustable ISO Aperture and Shutter Speed with Cold Shoe Lightmeter for Film Camera Light Meter Photography (Silver)
Vintage Charm, Modern Reliability: Made from featherlight aircraft-grade aluminum (34g), the retro-styled TTARTISAN Light Meter II enhances your…
As an affiliate, we earn on qualifying purchases.
As an affiliate, we earn on qualifying purchases.
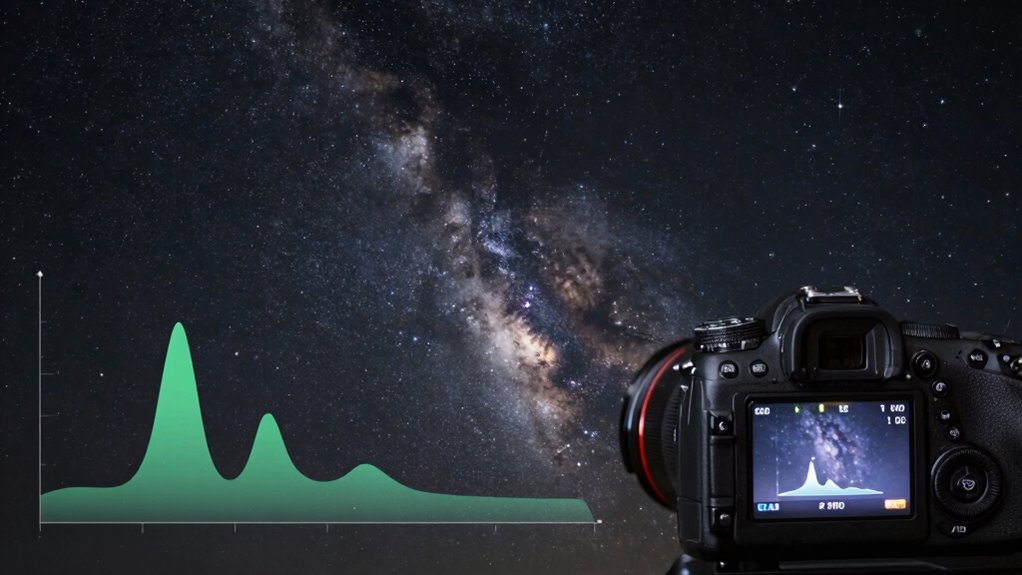
Decoding Histogram Shapes to Improve Your Astrophotos
Understanding the shape of your histogram is key to evaluating and improving your astrophotos. A well-balanced histogram shows a peak toward the middle, indicating good exposure without clipping highlights or losing details in shadows. If the histogram is skewed left, your image may be underexposed, hiding faint stars or nebulae. Conversely, a histogram pushed right suggests overexposure, risking star burnouts. Sensor sensitivity plays a role; higher ISO settings can cause the histogram to cluster toward the right, especially with light pollution, which adds unwanted brightness. Recognizing these shapes helps you adjust exposure settings, ISO, and contrast to optimize detail and minimize noise. Decoding your histogram empowers you to make informed adjustments, leading to clearer, more detailed astrophotos. Additionally, considering eco-friendly practices in your photography setup can enhance your overall experience while minimizing environmental impact.

Portable Power Station 600W 293Wh Camping Lithium Battery, Portable Generator for Home Use Emergency Power Station Backup Travel Outdoor 100W PD & 120V Pure Sine Wave AC Outlet
Portable Power Station 600W from bailibatt – Provides fast, safe and reliable portable generators with 600W Pure Sine…
As an affiliate, we earn on qualifying purchases.
As an affiliate, we earn on qualifying purchases.
How to Set Up Your Camera to Read Histograms Effectively

To read histograms effectively, start by adjusting your camera’s viewfinder or live view display to show the histogram. Proper camera calibration guarantees the display accurately represents exposure levels, making it easier to interpret. Before shooting, verify your lens selection; different lenses can affect exposure and how the histogram appears, especially in low-light conditions. Use a calibrated camera to avoid misleading readings caused by sensor inconsistencies. Set your camera to show the histogram in real-time, allowing you to evaluate exposure instantly. Guarantee your display brightness isn’t too high or low, as this can distort histogram perception. With the right camera calibration and lens choice, you’ll get a clear, reliable histogram that guides you toward prime exposure, reducing guesswork during astrophotography sessions.
Adjusting Camera Settings Using Histogram Feedback

Once you understand how to read your histogram, you can start adjusting your camera settings more accurately. By fine-tuning your exposure based on the histogram, you guarantee your photos have the right brightness and detail. This process helps you avoid overexposure or underexposure, giving you better control over your images. Additionally, understanding herbal baths can also enhance your overall photography workflow by allowing you to analyze your shooting conditions effectively. Properly managing firewood storage can also ensure that you have the right materials on hand for optimal shooting conditions. Utilizing the right wall surfaces can also improve your shooting environment by reflecting light more effectively.
Reading The Histogram Properly
Reading the histogram properly is essential for making quick, informed adjustments to your camera settings. It reveals whether your exposure is balanced, too bright, or too dark, helping you avoid color calibration issues and lens distortion effects. Focus on the distribution:
| Zone | Meaning | Adjustment Tip |
|---|---|---|
| Left (shadows) | Underexposed, details lost | Increase exposure or ISO |
| Middle | Proper exposure | Fine-tune for clarity |
| Right (highlights) | Overexposed, clipping | Reduce exposure or ISO |
A well-balanced histogram ensures your astro shots aren’t clipped or muddy. Watch for spikes at the edges, indicating potential clipping. Proper interpretation helps maintain data integrity, making post-processing easier and more accurate.
Fine-Tuning Exposure Settings
Adjusting your camera settings based on histogram feedback allows you to quickly achieve ideal exposure for astrophotography. Once you see the histogram, you can fine-tune your settings:
- Adjust ISO – Increase or decrease to control brightness without overexposing bright stars or losing faint details.
- Modify aperture – Open wider for more light or narrow for sharper focus, considering lens distortion effects.
- Set shutter speed – Balance exposure time to prevent star trails while capturing enough light.
- Review color calibration – Ensure colors appear natural and consistent across the histogram, avoiding color shifts that distort star colors. By using histogram feedback, you can also identify lens distortion impacts, helping you correct framing and focus. This process guarantees your astrophotos are well-exposed, vibrant, and accurately colored.
Troubleshooting Exposure Issues With Histogram Insights
When your photos don’t look quite right, the histogram can be a powerful tool to diagnose exposure problems. If the histogram shows clipping on the right, your sensor sensitivity might be too high, causing bright areas to lose detail. Conversely, if the histogram is bunched up on the left, your exposure could be too dark, missing faint details in the night sky. Light pollution can also distort the histogram, creating a skewed or uneven distribution that complicates adjustments. Use the histogram to evaluate whether you need to lower your sensor sensitivity or adjust your exposure settings. By paying close attention to these insights, you can prevent overexposure or underexposure, leading to cleaner, more balanced astrophotographs. Understanding sensor sensitivity is key to achieving optimal exposure in varying lighting conditions.
Techniques to Enhance Your Night Sky Photos Beyond Histograms
While histograms are invaluable for evaluating exposure, enhancing your night sky photos often requires additional techniques to bring out detail and color. Focus on celestial composition to frame your shot, emphasizing interesting foreground elements or unique sky features. Use star trail techniques to create dynamic, sweeping patterns that convey motion and add drama. Consider stacking multiple exposures to improve noise reduction and dynamic range, revealing faint nebulae or subtle star colors. Adjust focus carefully to maximize sharpness, especially for pinpoint stars. Incorporate foreground lighting or silhouette to add depth and context. These methods, combined with proper planning, turn a basic shot into an enthralling astrophotograph, showcasing the grandeur and mystery of the night sky beyond what histograms alone can achieve. Additionally, utilizing quality monitors can enhance your editing process, ensuring that colors and details are accurately represented. Understanding media literacy principles can also help you discern the quality of the images you’re editing and viewing.
Mastering Histogram Use for Consistent Astro Photography Results

Mastering histogram use is essential for achieving consistent results in astro photography because it provides a clear, visual way to evaluate exposure and tonal distribution. By regularly analyzing histograms, you can avoid common astrophotography challenges like overexposed stars or loss of detail in shadows. Maintaining your equipment, such as cleaning lenses and calibrating your camera, guarantees accurate histogram readings. When you understand how to interpret these graphs, you can make real-time exposure adjustments, improving image quality and consistency. This skill helps you troubleshoot issues quickly, reducing wasted time during shoots. Ultimately, mastering histogram use empowers you to capture more precise, balanced shots, even in the unpredictable conditions of night sky photography.
Frequently Asked Questions
Can Histograms Help With Focusing in Low-Light Conditions?
Yes, histograms can help with focusing in low-light conditions. By analyzing the histogram accuracy, you can verify your sensor calibration is correct, which improves focus precision. As you adjust your focus, check the histogram to see if the peaks are sharp and well-defined, indicating good focus. This method removes guesswork, helping you achieve sharp stars and clear images even in challenging low-light astro photography scenarios.
How Do Different Camera Sensors Affect Histogram Interpretation?
Different sensor types, like full-frame or APS-C, affect how you interpret histograms because each has varying dynamic ranges. Full-frame sensors usually capture a broader dynamic range, making it easier to see detail in highlights and shadows. APS-C sensors have a narrower range, so you might see more clipped tones. Understanding your sensor’s dynamic range helps you adjust exposure correctly, ensuring your histogram accurately reflects your image’s brightness and detail.
Is It Better to Overexpose or Underexpose for Astrophotography?
You should avoid overexposing or underexposing by relying on histogram analysis; ironically, the perfect exposure isn’t about brilliance but balance. Slightly underexpose to preserve highlight details, then adjust exposure during editing if needed. Overexposing risks losing stars in bright areas, while underexposing hides faint celestial objects. Use exposure adjustment wisely, review your histogram carefully, and fine-tune to guarantee your astrophotography captures the night sky’s true beauty.
How Do Light Pollution Levels Influence Histogram Readings?
Light pollution levels, like urban glow and sky brightness, considerably influence your histogram readings. Higher light pollution causes more background brightness, shifting the histogram to the right and risking overexposure. With increased sky brightness, you’ll see a flatter histogram, making it harder to capture faint stars. To counter this, adjust your exposure settings to avoid clipping highlights while preserving details in darker areas, ensuring your histogram accurately reflects the scene.
Can Histogram Techniques Be Applied to Daytime or Landscape Photography?
Yes, histogram techniques work great for daytime and landscape photography. You can use the histogram to assess your dynamic range and achieve proper exposure balancing, ensuring highlights aren’t blown out and shadows retain detail. Some might think histograms are only for low-light scenes, but they’re versatile tools that help you make precise adjustments in bright daylight or complex landscapes, capturing the full tonal range effectively.
Conclusion
Once you master reading histograms, you’ll find exposing your night sky becomes as intuitive as reading a map. Think of the histogram as your celestial compass—guiding you to the perfect exposure without guesswork. I once watched a fellow astro photographer tweak settings based solely on his histogram, and his shot transformed overnight. With this trick in your toolkit, you’ll confidently capture stunning, well-exposed astrophotos every time, turning the dark sky into your canvas.