
To master gradient removal and color calibration troubleshooting in a weekend, focus on understanding common causes like outdated hardware or miscalibration. Use professional tools such as colorimeters and spectrophotometers, and follow best workflows by consistently profiling and calibrating your devices. Practice identifying symptoms like color banding and uneven gradients, then apply targeted correction methods. Regular testing across devices and refining your process will boost your confidence—continue exploring the details to sharpen your skills further.
Key Takeaways
- Use calibrated monitors and colorimeters to establish accurate device profiles before starting gradient removal.
- Identify gradient types and apply targeted techniques like blending modes or masks for seamless correction.
- Regularly verify calibration accuracy with test patterns and histograms across different lighting conditions.
- Follow a structured workflow with documented steps to troubleshoot and refine color and gradient adjustments efficiently.
- Continuously update your skills through online courses, industry resources, and practice to master advanced calibration and removal techniques.

Celestron NexStar 6SE Computerized Telescope – 6-Inch Schmidt-Cassegrain Optical Tube – Fully Automated GoTo Mount with SkyAlign – Ideal for Beginners and Advanced Users – 40,000+ Object Database
ADVANCED TECH MEETS ICONIC DESIGN: The NexStar 6SE pairs Celestron’s legendary orange tube with a fully computerized GoTo...
As an affiliate, we earn on qualifying purchases.
Understanding the Causes of Gradient Issues and Color Calibration Problems

Gradient issues and color calibration problems often stem from improper settings or hardware limitations. One common cause is the presence of a color cast, which skews the overall tone, making the gradient appear tinted or uneven. Uneven lighting during capture can also create abrupt shifts in brightness and color, leading to visible bands or patches. These issues disrupt smooth progressions in gradients and hinder accurate color calibration. Hardware limitations, such as outdated monitors or insufficient color profiles, can exacerbate these problems. Additionally, inconsistent calibration across devices may cause color mismatches. Understanding these root causes helps you recognize how improper setup, lighting conditions, and hardware constraints contribute to gradient and color calibration issues, paving the way for effective troubleshooting and correction. Moreover, the increasing integration of AI in Education has highlighted the importance of accurate color and visual representations, especially in digital learning tools, emphasizing the need for precise calibration techniques.

Celestron StarSense Explorer 150AZ App-Enabled Telescope – 150mm Tabletop Dobsonian with Smartphone Dock & StarSense App – iPhone & Android Compatible – Easy-to-Use for Beginners
SMARTPHONE-POWERED SKY TOUR: No experience needed! Just dock your phone, launch the StarSense Explorer app, and follow the...
As an affiliate, we earn on qualifying purchases.
Gathering Essential Tools and Software for Troubleshooting

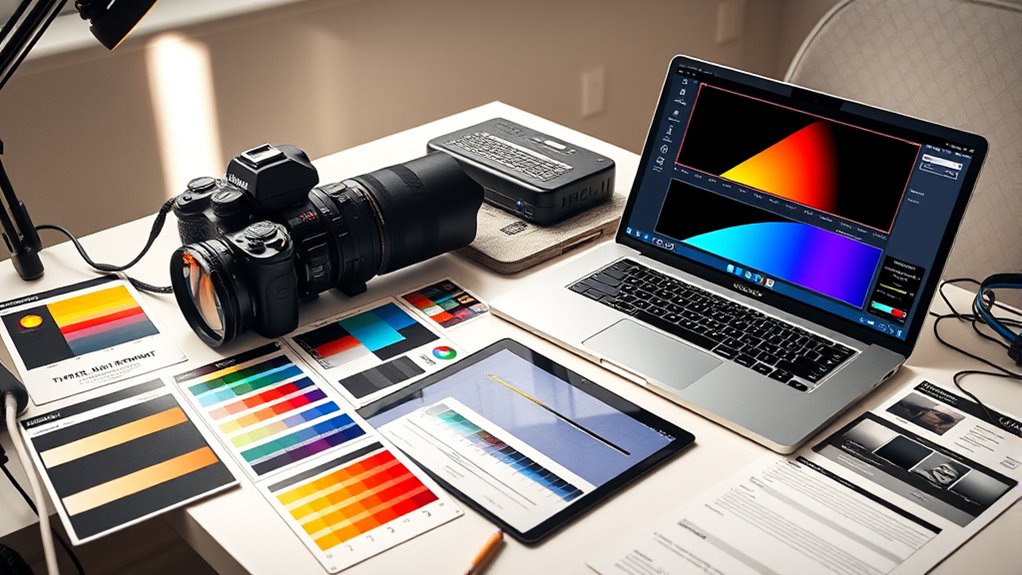
To troubleshoot gradient removal and color calibration issues effectively, you’ll need the right hardware and software tools. Having a calibrated monitor, a colorimeter, and a reliable calibration software can make a big difference. GMC tuning techniques can also be applied to optimize display settings for better accuracy. Let’s explore the essential components and programs that will help you identify and fix problems efficiently.
Necessary Hardware Components
Having the right hardware components is essential for effective troubleshooting of gradient removal and color calibration issues. You’ll need reliable monitoring hardware, such as colorimeters or spectrophotometers, to accurately assess color accuracy and gradient transitions. These tools guarantee your display’s output matches calibration standards, providing consistent results. A high-quality monitor with good uniformity and adjustable settings is also vital, allowing precise calibration adjustments. Keep calibration standards, like standardized white points and gray scales, on hand to verify your calibration process. Such standards help identify discrepancies and ensure your setup adheres to industry benchmarks. Investing in these hardware components streamlines troubleshooting, saves time, and leads to more accurate, professional results in color management. Additionally, staying informed about technological advances in display calibration can help you adopt more effective methods and tools over time.
Recommended Software Tools
Effective troubleshooting of gradient removal and color calibration issues relies heavily on the right software tools. You need programs that guarantee strong software compatibility across your hardware and operating system, minimizing glitches during adjustments. Look for tools that support accurate color profiling, which is essential for matching colors precisely and correcting gradients effectively. Popular options include Adobe Photoshop, Lightroom, and specialized calibration software like X-Rite i1Profiler or DisplayCAL. These programs allow you to create precise color profiles, identify inconsistencies, and test calibration accuracy. Ensure the software you choose integrates well with your existing workflow to streamline troubleshooting. Using color calibration, you can achieve consistent and accurate color reproduction across devices, which is crucial for effective gradient removal and troubleshooting. By selecting the right tools, you can quickly diagnose issues, adjust settings, and restore accurate color reproduction with confidence and efficiency.

Celestron – Origin Intelligent Home Observatory – All-in-one Astroimaging and Stargazing Smart Telescope – 6-inch RASA Telescope – Fully-Automated GoTo Mount – User-Friendly – iOS/Android Compatible
STARGAZING AND ASTROIMAGING REDEFINED: Celestron Origin is an intelligent, all-in-one home observatory that captures stunning views of celestial...
As an affiliate, we earn on qualifying purchases.
Identifying Common Symptoms and Diagnosing Problems

When troubleshooting gradient removal and color calibration issues, recognizing the most common symptoms can save you time and frustration. If your images show inconsistent color or appear dull or overly vibrant, poor color consistency is likely the culprit. You might notice that colors don’t match across different devices or look off compared to your original reference. Monitor calibration problems can also cause these symptoms, making your screen display inaccurate colors. If adjustments don’t improve the display, it’s a sign your monitor may need recalibration. Additionally, uneven gradients, color banding, or unexpected shifts in hue indicate issues that require diagnosis. Spotting these signs early helps you identify whether the problem stems from improper calibration, flawed software settings, or monitor inaccuracies, streamlining your troubleshooting process.
Celestron – AstroMaster 114EQ Newtonian Telescope – Manual Reflector for Beginners – Aluminized Mirror – Adjustable-Height Tripod – Includes Accessories Plus Astronomy Software Package
POWERFUL TELESCOPE FOR ASTRONOMY BEGINNERS: The AstroMaster 114EQ delivers sharp optics, a stable equatorial mount, and smooth manual...
As an affiliate, we earn on qualifying purchases.
Step-by-Step Guide to Removing Unwanted Gradients in Images

To effectively eliminate unwanted gradients, you first need to identify the type you’re dealing with. Once you know the gradient type, you can apply the most suitable removal techniques. This step-by-step approach ensures your images look clean and professional. Incorporating image tuning techniques can further refine your results for a polished finish.
Identify Gradient Types
Understanding the different types of gradients is essential for removing them effectively. By mastering gradient classification, you can identify the specific visual gradient types present in your image. Common types include linear, which changes uniformly across a straight line, and radial, which radiates from a central point. There are also more complex variations like angular or multi-directional gradients. Recognizing these distinctions helps you choose the most appropriate removal technique. Pay attention to how the color or brightness shifts across the image—smooth transitions suggest simple gradient types, while abrupt changes may indicate more complex issues. Accurate identifying gradient types guarantees you apply targeted adjustments, saving time and improving your results during the removal process.
Apply Effective Removal Techniques
Removing unwanted gradients effectively involves applying specific techniques tailored to the gradient type you’ve identified. Advanced blending methods, such as gradient masks and layer blending modes, allow you to seamlessly hide or reduce gradient effects. Use color profiling to guarantee your adjustments match the original image’s color space, preventing unwanted shifts during correction. For subtle gradients, apply selective adjustments like local contrast or tone curves, blending them smoothly into the background. For more pronounced gradients, consider using frequency separation or gradient removal filters. Always preview your results at different zoom levels to confirm consistency. Combining these techniques ensures a natural look while preserving image quality. Mastering advanced blending and accurate color profiling is essential for effective, professional-grade gradient removal. Understanding color management is also key to maintaining color accuracy throughout your editing process.
Techniques for Accurate Color Calibration Across Devices

Achieving consistent color calibration across different devices can be challenging, but employing the right techniques makes it possible. Focus on precise color matching by using calibration tools designed for your devices, such as colorimeters or spectrophotometers. Begin by creating accurate device profiles; these profiles serve as a reference for translating colors between devices. Regularly calibrate each device to maintain color accuracy over time. When calibrating, ensure that ambient lighting is consistent, and use test patterns to verify results. Keep in mind that different screens and printers may respond differently, so adjusting profiles accordingly helps achieve uniformity. Mastering device profiling and applying consistent calibration practices are essential steps to guarantee reliable, true-to-color outputs across all your devices. Additionally, understanding the signs of spoilage in consumables can help prevent using compromised materials that could affect calibration accuracy or display quality.
Practicing Effective Workflow Strategies for Fast Troubleshooting

Implementing effective workflow strategies is essential for troubleshooting issues quickly and efficiently. By streamlining your process, you reduce errors and save time on gradient removal and color calibration. Focus on color management from the start, guaranteeing your tools and files are consistently calibrated. Enhance your workflow by setting clear steps and checkpoints, avoiding unnecessary repetition. Use the following table to visualize key strategies:
| Step | Action | Benefit |
|---|---|---|
| 1 | Use consistent color profiles | Ensures accurate results |
| 2 | Automate repetitive tasks | Saves time and reduces errors |
| 3 | Document your process | Facilitates quick troubleshooting |
This approach keeps your workflow efficient, helping you identify issues faster and maintain optimal color management throughout. Incorporating proper documentation into your process can further facilitate troubleshooting and ensure consistency.
Testing and Refining Your Results to Ensure Consistency

To guarantee your gradient removal and color calibration efforts produce consistent results, it’s essential to test and refine your adjustments systematically. Start by reviewing your images across different devices and lighting conditions to check for color consistency. Use histograms and color meters to assess calibration accuracy, ensuring no subtle shifts occur. Make small, incremental tweaks and re-test each time to observe how changes impact overall consistency. Keep detailed notes of your adjustments to track what works best. Consistently evaluating your results helps you identify any lingering issues with color accuracy or gradients. Additionally, implementing remote work strategies can allow for more flexible testing routines outside traditional environments. This process ensures your calibration remains reliable and your images maintain a uniform appearance, giving you confidence that your corrections will hold true across future projects.
Resources and Tips for Continuing Your Skills Beyond the Weekend

Building on your efforts to test and refine your gradient removal and color calibration skills, expanding your knowledge with additional resources can help you maintain and improve your techniques over time. To advance your skills, consider these tips:
- Explore online courses focused on advanced color grading techniques to deepen your understanding.
- Invest in a high-quality monitor calibration tool to ensure consistent color accuracy across devices.
- Follow industry experts on social media or forums for ongoing advice and latest trends.
- Read specialized books or articles on monitor calibration and color management to refine your approach.
Consistently practicing these tips will help you master gradient removal and color calibration, elevating your editing precision and color consistency in any project.
Frequently Asked Questions
Can Specific Camera Settings Cause Gradient Issues in Images?
Yes, specific camera settings can cause gradient issues in images. Your camera sensor’s exposure, ISO, and white balance settings directly influence how light and color are captured during image processing. If these settings aren’t optimized, they can lead to uneven light distribution, creating unwanted gradients. Adjusting these parameters carefully guarantees better sensor performance and smoother gradients, reducing the need for extensive post-processing and making your images look more professional.
How Do Ambient Lighting Conditions Affect Color Calibration Accuracy?
Ever wonder why your photos look like they’ve had a wild party with ambient light? Well, that’s your answer. Ambient lighting conditions mess with your color calibration, making it hard to achieve color consistency. Bright or uneven ambient light skews colors, forcing you to chase ghosts. To keep your colors true, shoot in controlled lighting environments or calibrate your camera and monitor under the same ambient light, ensuring your colors stay consistent and fabulous.
Are There Automatic Tools for Detecting Subtle Gradient Problems?
Yes, there are automatic detection tools for subtle gradients that can help you identify issues quickly. These tools analyze your images or displays to pinpoint areas with uneven color shifts, saving you time and effort. By using software like ImageJ, Photoshop, or specialized calibration tools with automatic detection features, you can efficiently spot and address subtle gradient problems, ensuring your calibration is precise and consistent across your entire display.
What Are the Best Practices for Backing up Calibration Profiles?
You should regularly back up your calibration profiles by saving them in a dedicated folder with clear labels for easy access. Use reliable storage options like external drives or cloud services to guarantee calibration storage security. Keep your profile organization consistent, updating backups whenever you make adjustments. This way, you can quickly restore your calibration settings if needed, minimizing downtime and maintaining color accuracy across your projects.
How Often Should I Recalibrate My Monitor for Consistent Results?
Think of your monitor like a car’s engine—regular tune-ups keep it running smoothly. You should recalibrate your monitor every 2 to 4 weeks to maintain consistent results. Calibration frequency depends on your workflow and environment. If you notice color shifts or discrepancies, it’s time for a recalibration. Staying proactive guarantees your colors stay accurate, just like a well-maintained engine keeps your car running at peak performance.
Conclusion
Mastering gradient removal and color calibration in a weekend is achievable with focus and practice. Remember, “practice makes perfect,” so don’t get discouraged by initial setbacks. Keep experimenting, stay patient, and refine your skills step by step. With these techniques, you’ll troubleshoot like a pro and produce consistently flawless images. Dedicate your weekend to learning, and you’ll turn challenges into opportunities for sharp, professional results.