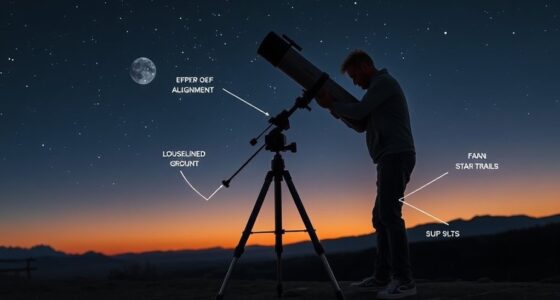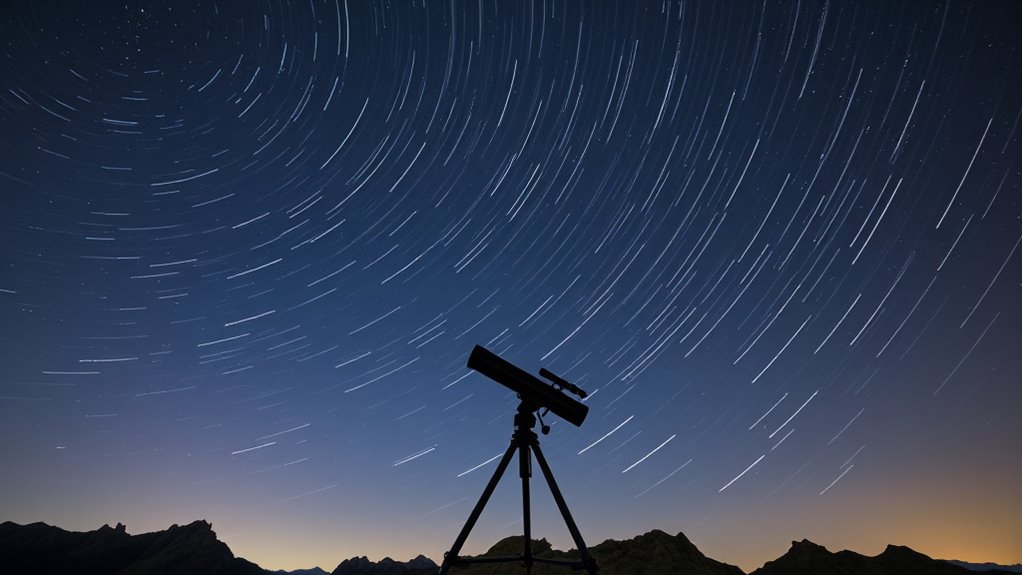

Proper polar alignment is vital for long exposure astrophotography because it guarantees your mount tracks celestial objects accurately as the Earth rotates. When aligned correctly, your camera captures sharp, pinpoint stars without trails or blurriness. Even tiny misalignments can cause star streaks over time, ruining your images. Getting your polar alignment right is the foundation for successful astrophotography, and if you keep exploring, you’ll discover how to perfect your technique even further.
Key Takeaways
- Precise polar alignment prevents star trails, ensuring stars remain pinpoint during long exposures.
- It minimizes tracking errors, leading to sharper, clearer astrophotography images.
- Proper alignment reduces image distortion caused by mount misbehavior over extended periods.
- Accurate polar alignment enhances the effectiveness of guiding systems and overall tracking stability.
- It is essential for capturing detailed celestial objects without blurring from Earth’s rotation.

Achieving precise polar alignment is essential for long exposure astrophotography, as even slight misalignments can cause star trails and blurry images. When you set up your mount, proper equipment calibration is the foundation for success. This means ensuring your mount’s axes are aligned correctly and that all mechanical components move smoothly and accurately. If your equipment isn’t calibrated, even the best star tracking methods won’t compensate for the inherent inaccuracies, resulting in streaked stars instead of crisp points. Regular calibration checks are vital, especially after transportation or if you notice your images aren’t sharp. Calibration involves aligning your mount’s polar axis with the celestial pole, typically using built-in calibration tools or visual methods like polar scopes. Accurate calibration minimizes errors in tracking and keeps your stars pinpoint sharp during long exposures. Utilizing local landmarks or known stars can also assist in verifying the accuracy of your polar alignment. Once your equipment is calibrated, star tracking methods come into play. These techniques are designed to follow the apparent motion of stars across the sky, compensating for Earth’s rotation. The most common method involves manually aligning your mount’s polar axis with the celestial pole using a polar scope or a reticle eyepiece. You need to center Polaris (or the North Celestial Pole if you’re in the Northern Hemisphere) precisely within the reticle. Small adjustments can make a significant difference in tracking accuracy. Some advanced mounts incorporate computerized go-to systems that automatically perform polar alignment and tracking calibration, streamlining the process and reducing user error. Regardless of the method, the goal is to create a setup where the mount’s motors can track the stars smoothly without lag or drift. Star tracking methods aren’t limited to manual or automated approaches; they also involve periodic corrections during your session. Slight adjustments to the mount’s position or guiding corrections with a guide scope help keep stars sharp during extended exposures. This is especially important when shooting images for several minutes or longer, where even minor errors accumulate. Using a guide camera to monitor star movement allows you to make real-time corrections, ensuring your star trails are minimized or eliminated. Proper equipment calibration combined with effective star tracking methods ultimately ensures your long exposure images are sharp and detailed, capturing the beauty of the night sky without unwanted trails. When you invest time in setting up your mount correctly and employing precise tracking techniques, you’ll notice a dramatic improvement in image quality, making all those late-night sessions worthwhile.
Smart Telescope, Professional Refractor Auto-focus Portable Digital Electronic Telescopes with 4K Astrophotography Camera, Internal And Externat Dual Screens Spotter for Adults and Beginners Astronomy
Exceptional Optical Performance:Equipped with a powerful 80mm aperture and 300mm focal length (f/8.89), this telescope for adults delivers...
As an affiliate, we earn on qualifying purchases.
Frequently Asked Questions
Can Polar Alignment Be Done Without Special Tools?
You can attempt polar alignment without special tools, but it’s challenging. You’ll need to rely on visual methods like mount calibration and star tracking, observing how well your telescope follows the stars. By adjusting your mount based on these observations, you improve tracking accuracy. However, for precise long exposures, using tools like a polar scope or software helps achieve better alignment, ensuring your images stay sharp over extended periods.
How Often Should I Realign My Polar Alignment?
Your polar alignment is the backbone of perfect astrophotography, so don’t let it slip! You should recalibrate your setup every few weeks or after significant changes in your equipment or location. Regular checks ensure alignment stability and prevent those pesky star trails. Keep an eye on calibration frequency and realign promptly to maintain pinpoint accuracy, especially during long exposures, so your images stay sharp and stunning.
Does Latitude Affect Polar Alignment Accuracy?
Yes, latitude influences your polar alignment accuracy because it determines your celestial navigation setup. When using an equatorial mount, you need to adjust the mount’s polar axis according to your specific latitude to align with Earth’s rotational axis properly. Failing to consider latitude can cause misalignment, making long exposure astrophotography difficult. Accurate polar alignment ensures your telescope tracks celestial objects smoothly, regardless of your position on Earth.
What Are Common Signs of Poor Polar Alignment?
Imagine your telescope trying to dance in sync with the stars, but it stumbles. Signs of poor polar alignment include star trails instead of pinpoint images, elongated or streaked stars, and inconsistent tracking errors. You might also notice objects drifting out of your field of view over time. These issues indicate polar misalignment, making long exposures blurry and defeating your astrophotography goals. Correct alignment keeps your star dance smooth and precise.
Can Polar Alignment Be Automated With Software?
Yes, you can automate polar alignment using software automation with polar alignment tools. These tools, often paired with mount controllers and specialized software, guide you through precise adjustments quickly. You simply follow the software’s instructions, which analyze star positions and suggest corrections. This makes the process faster, more accurate, and less frustrating, ensuring your telescope is perfectly aligned for long exposures without the need for complex manual adjustments.

ZWO Seestar S50 Smart Digital Telescope All-in-One Autofocus Portable for Beginners and Experienced Users-Open Box Like-New Condition Telescope
Lightweight Design: highly integrated all-in-one smart telescope. Seestar is a compact body that integrates a telescope, electrical focuser,...
As an affiliate, we earn on qualifying purchases.
Conclusion
Just like ancient sailors relied on the North Star to find their way, mastering polar alignment guides your telescope through the night’s vast expanse. When you get it right, your long exposures capture the universe’s true beauty without star trails or blurs. Remember, precision now unlocks breathtaking cosmic images later—your own voyage into the stars. So, embrace the alignment process; it’s your secret compass to stunning astrophotography.

Celestron StarSense Explorer LT 114AZ App-Enabled Telescope – 114mm Newtonian Reflector with Smartphone Dock & StarSense App – iPhone & Android Compatible – Easy-to-Use for Beginners
SMARTPHONE-POWERED SKY TOUR: No experience needed! Just dock your phone, launch the StarSense Explorer app, and follow the...
As an affiliate, we earn on qualifying purchases.

ZWO Seestar S30 All-in-One Smart Digital Telescope/Camera Compact and Portable Travel Companion for Astronomy Enthusiasts & Casual Stargazers
Ultra‑Portable & Automatic Star-Finding, Tracking, Shooting: Weighing no more than a bottle of soda, yet it’s a professional...
As an affiliate, we earn on qualifying purchases.